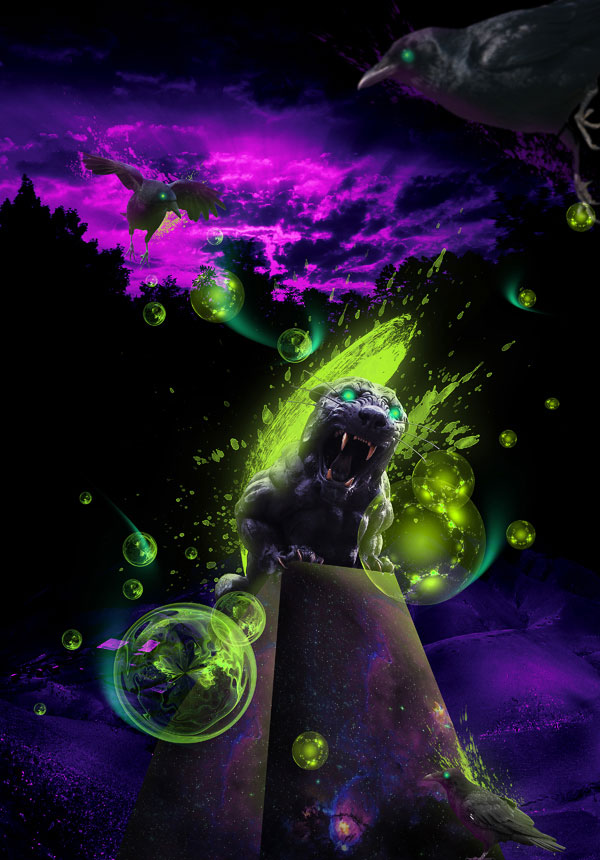
Make a Dark, Dreamlike Panther Scene in Photoshop
http://cs5tutorial.net/make-a-dark-dreamlike-panther-scene-in-photoshop/
Tutorial Resources
- Stock Image: Sky – “Breath of God” by SephirothXer0-Stock (Creative Commons)
- Stock Image: Desert – “fuerteventura” by clelia111 (Royalty-free)
- Stock Image: Panther – “Panther 1″ by SephirothXer0-Stock (Creative Commons)
- Stock Image: Nebula – “IC1805 The Heart Nebula” by Terry Standefer (Royalty-free)
- Brushes: Watercolour Brushes Set 2 by Franz Jeitz (Royalty-free)
- Brushes: Ink Squirts PS Brushes by WeGraphics (WeGraphics custom license)
- Stock Image: Crow 1 – “Raven” by Robert Linder (Royalty-free)
- Stock Image: Crow 2 – “Carrion Crow 19″ by WW-Stock (Creative Commons)
- Stock Image: Crow 3 – “crow” by Joan Kocur (Royalty-free)
- Stock Image: Fractal 1 – “My Fractal Stock 108.” by Myfractalstock (Royalty-free)
- Stock Image: Fractal 2 – “Stock 12.My Fractal Stock” by Myfractalstock (Royalty-free)
Step 1: Set Up the Photoshop Document
Open a new document in Photoshop. For your canvas, set the Width to 3000px and Height to 4300px. Set the Resolution to 300 pixels/inch.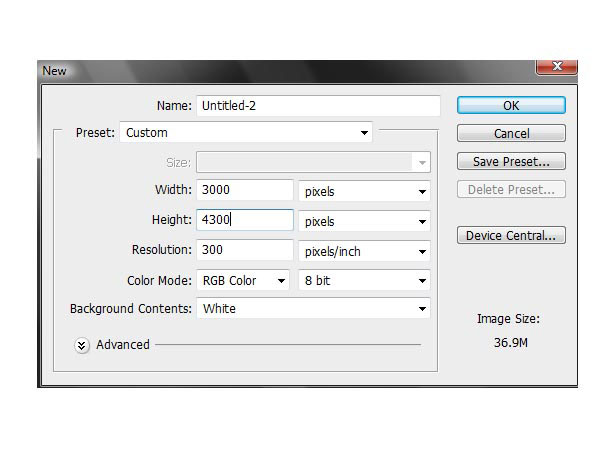
Step 2: Create the Background
Go to Layer > New > Group and create a group called “background”. We are going to use multiple groups to keep different layers of our composition in order.Download the Sky stock image and place it inside the “background” layer group. Place the image at the top left of the canvas.
Select the Move Tool (V), make sure that the Show Transform Controls option is checked, click-and-hold on the bottom right handle of the image and, while pressing down Shift, drag the bottom right handle to fill the canvas with the image. Just press Enter to commit the transformation.
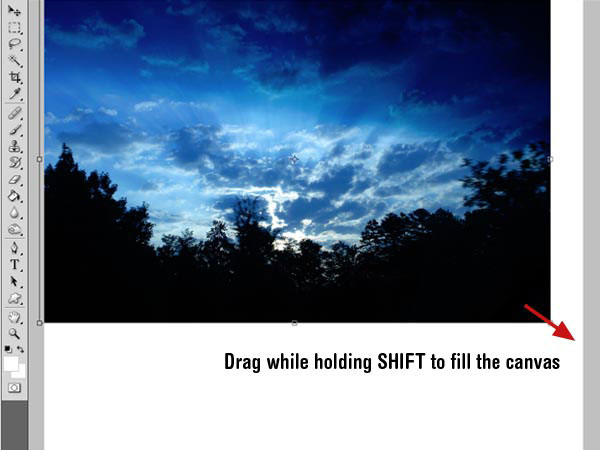
Go to Image > Adjustments > Brightness/Contrast and modify the images’ colors using the settings shown below (Brightness: 30, Contrast: 37).

Take the Paint Bucket Tool (G) and fill the rest of the layer with black (#000000).
Download the Desert stock image and place it inside the “background” group on top of the sky layer. Increase its size the same way as we did with the sky, so that it fills up the canvas.

We need to isolate the desert portion of the image from its sky (since we already have a sky). To do so, grab the Pen Tool (P), set its drawing option to Paths, and then draw a path along the edge of the dunes and the sky.
When you have your path closed, right-click inside of the path and pick Make Selection from the menu. Hit Delete to remove the sky from the image.
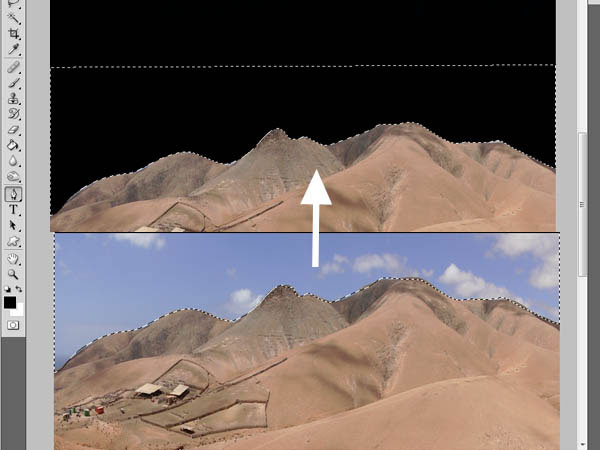
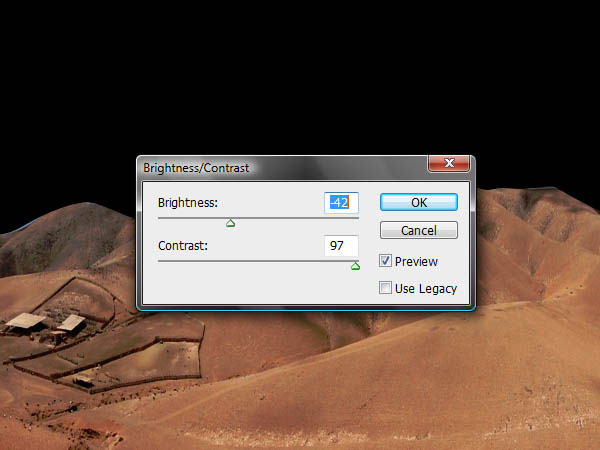
We also need a higher contrast for this stock image, so now go to Image > Adjustments > Brightness/Contrast again to adjust its colors (Brightness: -42, Contrast: 97).
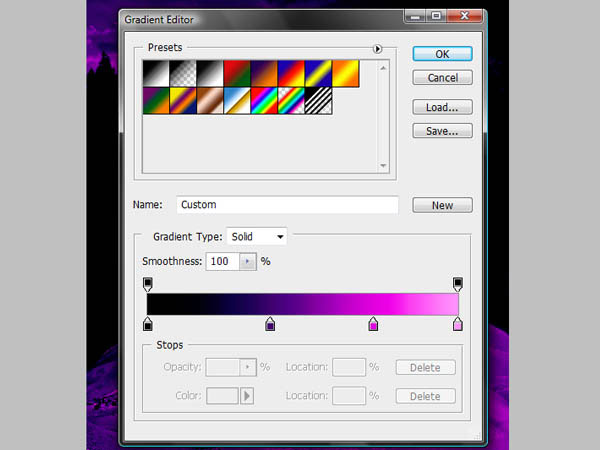
We are now going to set the main color of our background, which will be from a black to a light pink tone; we will use an adjustment layer for this. Go to Layer > New Adjustment Layer > Gradient Map. (This layer should be the top layer inside the “background” group.)
Add 2 more color stops in the middle of the gradient, making a total of 4 color stops. The first color stop should be black (#000000), the second should be purple (#391273), the third should be bright pink (#de0de1), and the last one should be pink (#fd9afe).
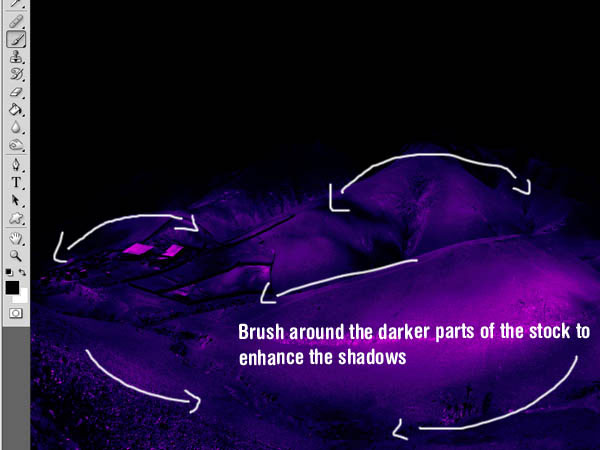
Right now, the desert still looks too bright and not very well blended with our background, so we need to enhance some of the shadows to make it fit our theme.
Create a new layer on top of the desert layer. Convert the new layer to a clipping mask of the desert layer by right-clicking on it and choosing Create Clipping Mask.
Tip: A shortcut for creating a clipping mask layer is by holding down Alt/Option and clicking between the two layers in the Layers Panel.
Set the clipping mask layer’s Blend Mode to Overlay. Prepare to paint on the clipping mask by choosing the Brush Tool (B) and finding a round brush that is about 500px wide, 0% Hardness and 25% Opacity (experiment with these settings). Now set your Foreground Color to black (#000000).
Brush over the top edges of the desert (shown in white) to make it fade with the black color of the sky layer. Also, brush around the shadow parts to make them darker (shown in white).
Step 3: Add the Subject – The Panther
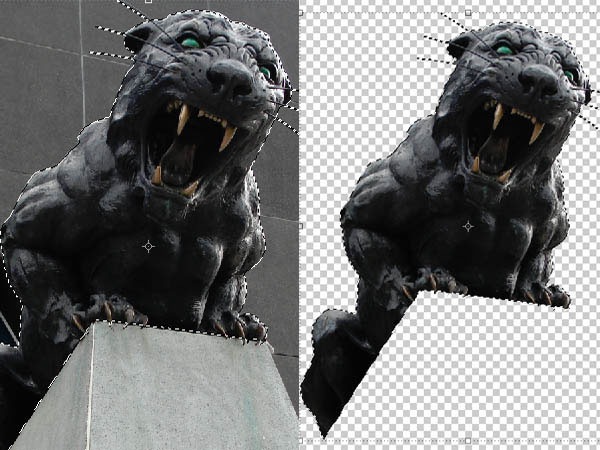
Our centerpiece is a menacing, almost nightmarish, panther. Download and open the Panther stock image and extract it from its background using a similar technique we used for the desert isolation process.Use the Pen tool (P) to draw a path along the edges of the panther. Make the path into a selection, invert it (Shift + Ctrl/Cmd + I) to select everything but the panther, and then press Delete to remove the background.
Create a new group over the “Background” group and rename the new group to “Panther” (just so that we are keeping our layers in order). Put the panther image inside this group.
To match the panther’s color scheme with our background, use the Brightness/Contrast image adjustment (Brightness: 35, Contrast: 58).
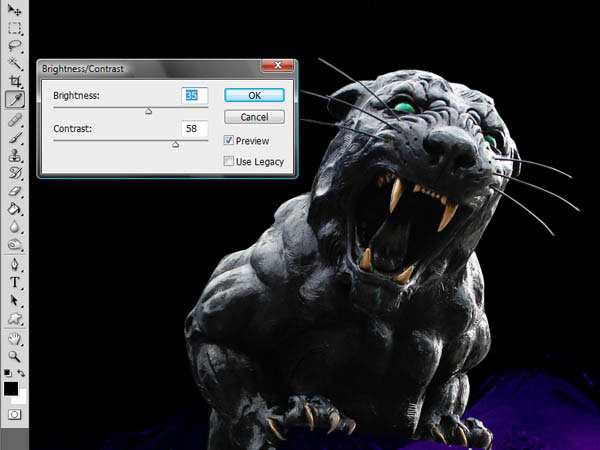
For the toning of our panther, go to Layer > New Fill Layer > Solid Color and select a dark purple tone (#2d086a).
Lower the Opacity of the fill layer to 40% and change its Blend Mode to Overlay.
Set the fill layer as a clipping mask of the panther layer.

Step 4: Create the Panther’s Stand
We will now create the platform in which our panther will stand on. Create a new group and name it “Stand”. In the Layers Panel, place this group below the “Panther” layer group.Create a new layer inside our new group, grab the Pen Tool (P) and draw a rectangular-shaped path that represents the front of the stand, keeping in mind the perspective of our scene as you draw. Try to create a path that resembles the position of the stand in the original stock image, as much as possible.
Fill the path with any color. You can do this by right-clicking within the path and then choosing Fill Path.
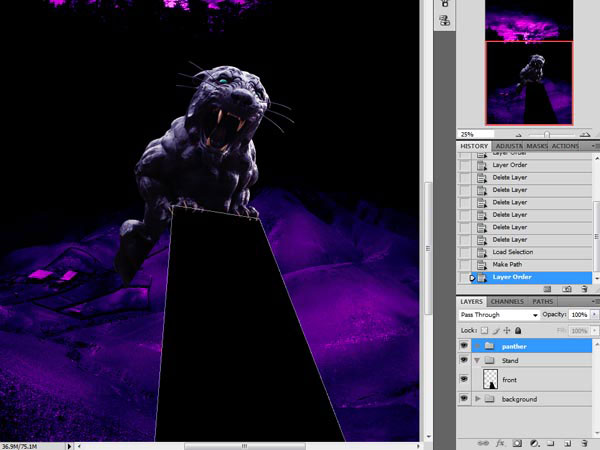
Create a new layer and use the same technique to make the left side of the stand.
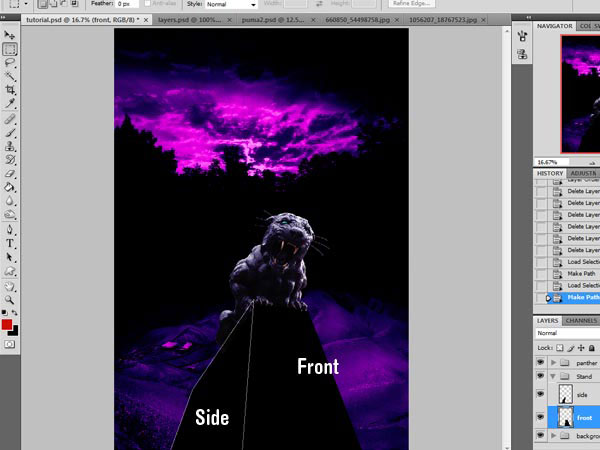
Download and open the Nebula stock image and open it in Photoshop. We are going to use this image to give the stand its texture and color.
We need to match the color of the stock with the color theme of our scene. To do this, we can use an image adjustment. Choose Image > Adjustment > Hue/Saturation (Ctrl/Cmd + U) and use the settings shown below (Hue: -148, Saturation: -25, Lightness: 0).

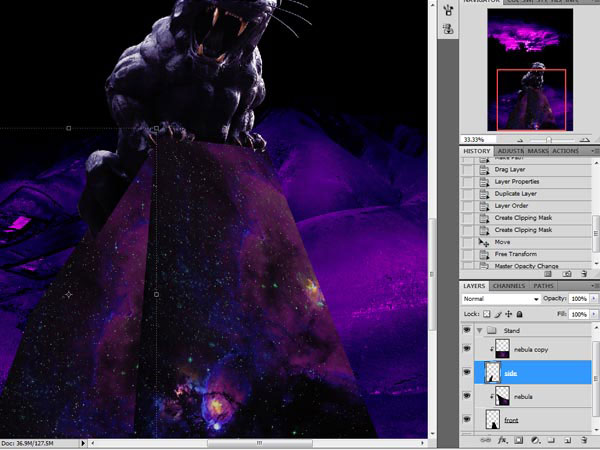
Drag the Nebula stock image into your canvas and then duplicate (Ctrl/Cmd + J) its layer 3 times. Place the layers over the stand and clip mask one nebula layer to each of the sides. The 3rd nebula layer that is not a clipping mask will be used for warping.
With the nebula layer (that isn’t a clipping mask) selected in the Layers Panel, go to Edit > Transform > Warp. Manipulate the warp’s grid to fit more areas of the nebula inside of the stand, and try to give it good flow and make it so that it looks as seamless as possible.
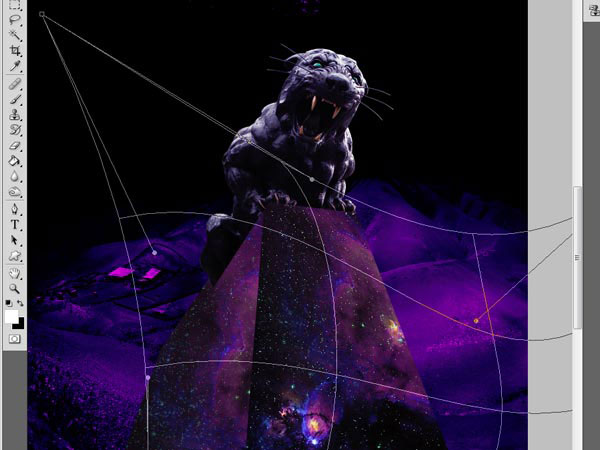
Do this for both of the clip-masked nebulas until you get a result like this:
Step 5: Add Watercolor and Ink Splatter Elements
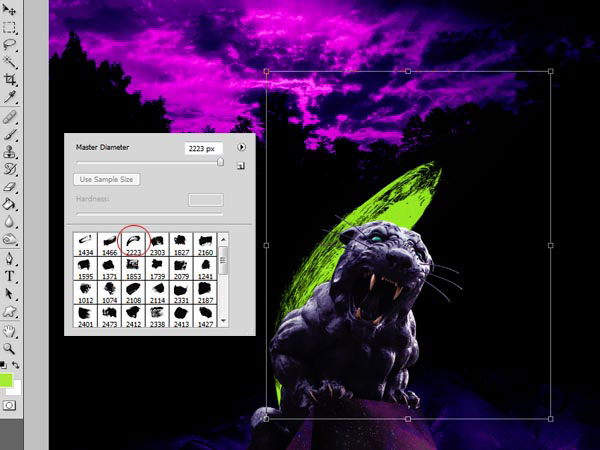
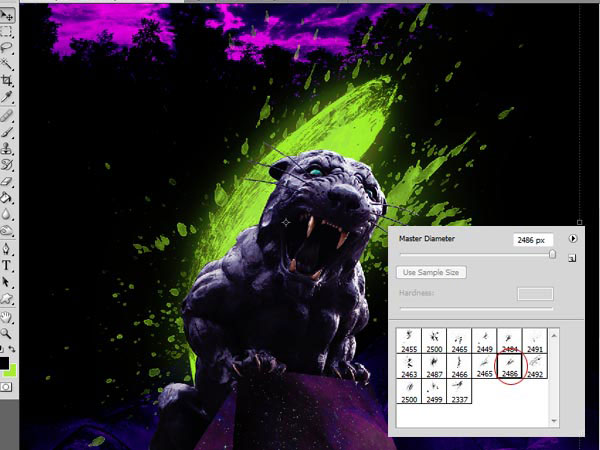
Create a new group under the “Panther” group and name it “watercolor”. Inside this folder, we are going to place all the elements related to watercolor strokes and paint splatters.Download and install the Watercolor brushes mentioned in the Tutorial Resources section above, and then select the Brush Tool (B) and load one of the brushes in Photoshop. Create a new layer and set your Foreground Color to a contrasting, lime green color (#b3ec34).
With the brush you selected, paint a stroke somewhere behind the panther (the brush in the set that I selected is circled in red on the following image). Use Free Transform (Ctrl/Cmd + T) to rotate the paint stroke until you get a position such as this:
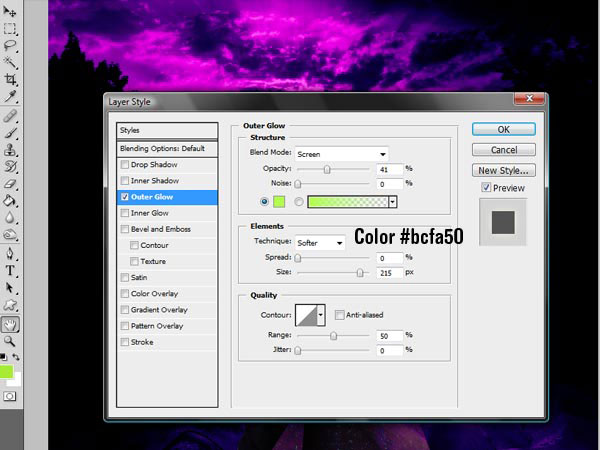
Double-click on the layer’s thumbnail in the Layers Panel to bring up the Layer Style dialog window. Use an Outer Glow layer effect to give the paint stroke a glowing effect.
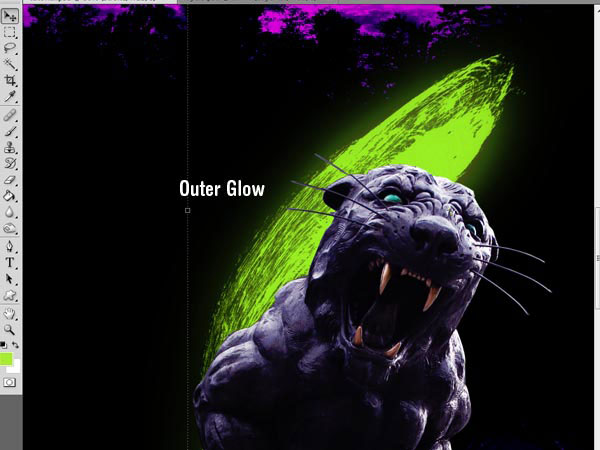
Close up, here is what the glowing effect looks like:
Create a new layer underneath the first watercolor stroke.
Now download and install the Ink Squirts PS Brushes from the website of Design Instruct contributor, Sebastiano Guerriero. Select one of the brushes in the set and apply it by the same location as the watercolor stroke (the one I selected is circled in red on the following image). You can use the Eraser Tool (E) to delete some parts of the ink squirt to get more control on your composition.
Use the same layer style as the watercolor stroke for the ink splatter’s layer.
Step 6: Add the Crows
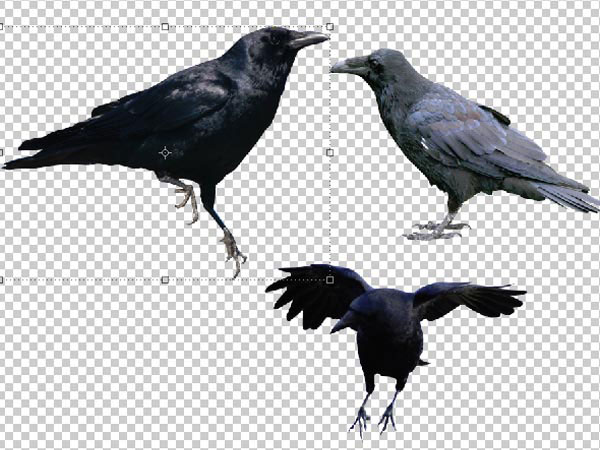
Download and open the 3 crow stock images mentioned in the Tutorial Resources section: Crow 1, Crow 2, and Crow 3.Extract them from their background using the Pen Tool (P), as we did for the preceding stock images. I have placed all the extracted crows in one document to show you how they look once removed from their backgrounds:
Create a new layer group on top of the “Panther” group, and name it “Crows”.
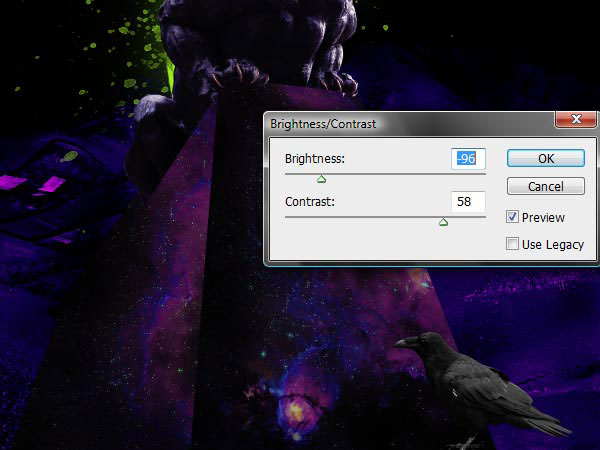
Take the first crow and drag it to the lower part of the canvas. It’s a little too bright and holds some color that is not in line with our color theme. Let us modify its colors to make it fit with our scene. First, desaturate the crow by going to Image > Adjustments > Desaturate (Shift + Ctrl/Cmd +U). Then adjust the Brightness/Contrast of the crow (Brightness: -96, Contrast: 58).
Place the second crow on the upper left part of our canvas. Go to Edit > Transform > Flip Horizontal to orient it the other way. Use Free Transform (Ctrl/Cmd + T) to rotate it a bit so it seems like it’s looking down on the panther. This additionally gives us a way to direct the viewer to our composition’s subject by pointing its beak towards the panther.
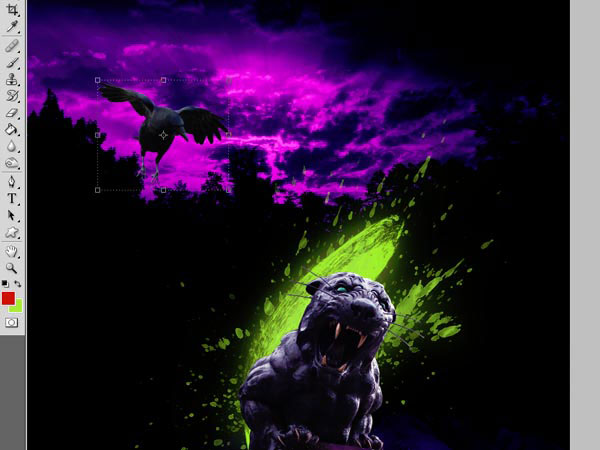
The third crow will be located on the top right of our scene and will be larger since it is closer to the viewpoint (i.e. it will be closer to the viewer’s point of view).
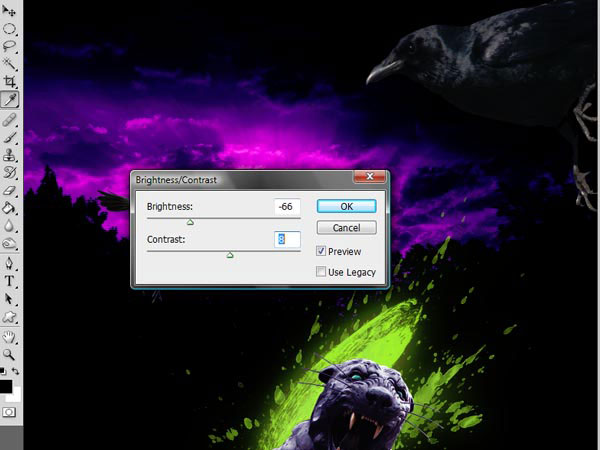
Adjust the Brightness/Contrast of the third crow (Brightness: -66, Contrast: 8). The third crow needs to be darker than the other ones since the environmental lightning hits it less.
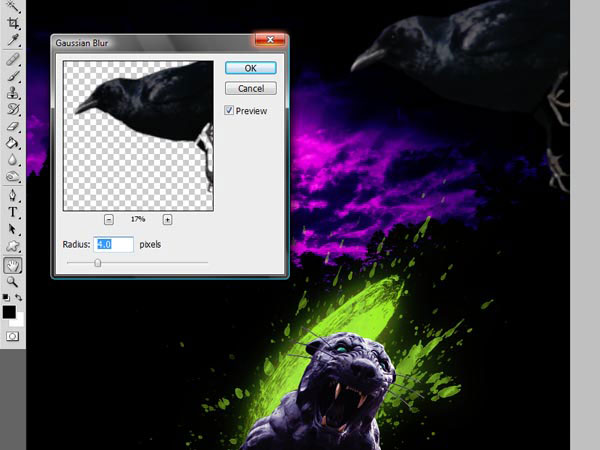
Go to Filter > Blur > Gaussian Blur. Use a Radius of 4.0px and apply the filter by pressing OK. This will make the crow look out of focus. Doing this ensures that it doesn’t take away from the focal point of our scene (the panther).
Step 7: Adding Highlights
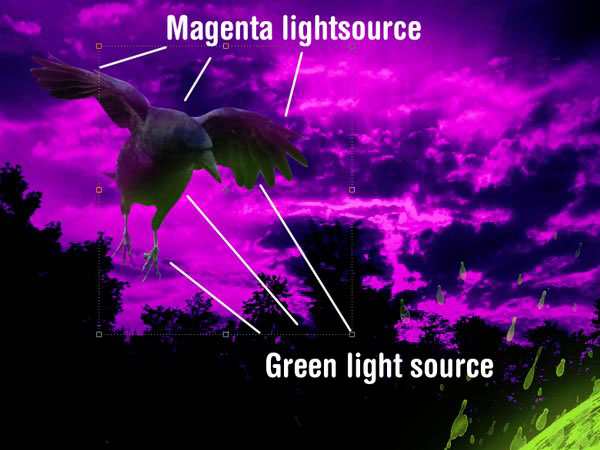
We are now going to apply highlights on certain elements of the composition according to the light sources. Our light sources are the sky and the watercolor stroke.We are going to create a clipping mask layer for each highlight we want to cast on an object in order to affect only the clipped object.
We will start with the statue since it is our main focal point. Create a new layer above the panther’s statue layer and convert the new layer to a clipping mask.
Most of the light will be coming from the watercolor stroke and with that in mind, let’s start brushing our highlights. Set your Foreground Color to green (#a6e039) and grab a round brush that is about 200px wide, 0% Hardness and 30% Opacity. Paint the edges where the green light should fall on the object.

Repeat the same process for both sides of the stand.
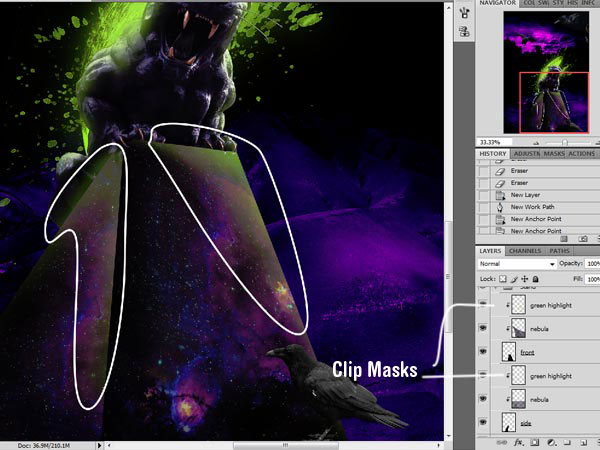
Repeat the same highlighting process for the crow that’s located at the bottom of the canvas (first crow).
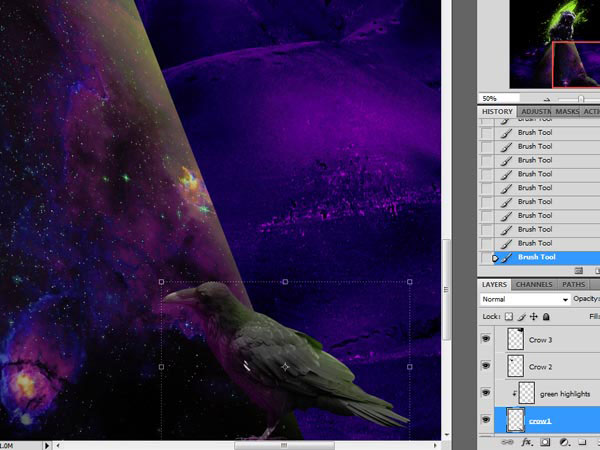
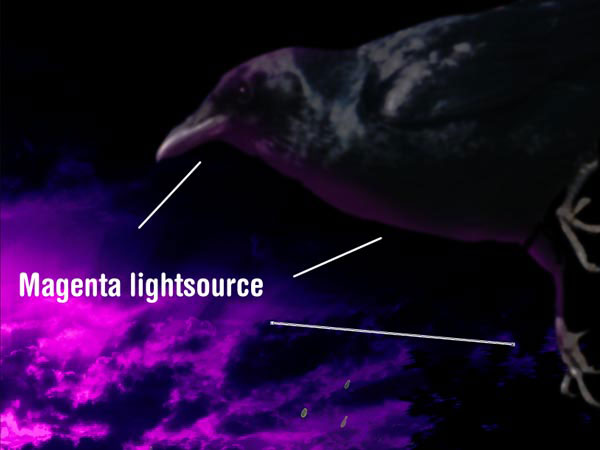
For the two remaining crows on top, in addition to the green light source, there would also be magenta highlights coming from the sky. Use a dark magenta tone (#e00fe2) — sampled from the sky using the Eyedropper Tool (I) — and brush where light from the background should hit them (indicated in white).
Step 8: Detailing with Watercolors and Ink Splatters
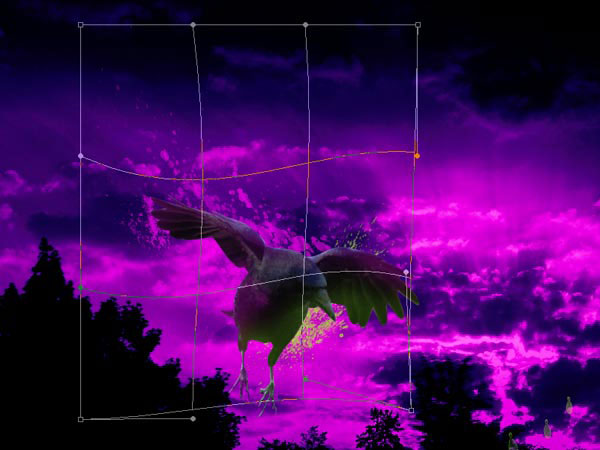
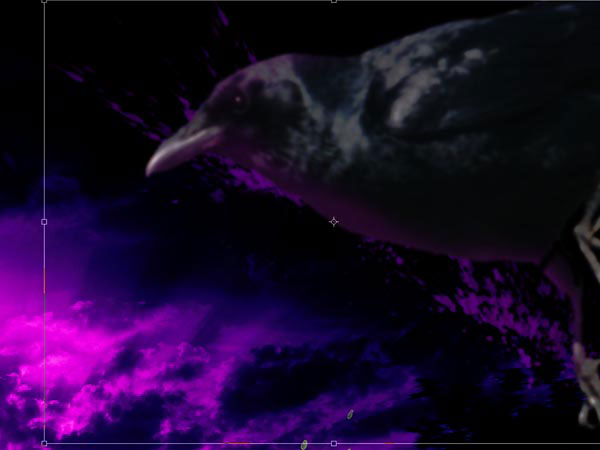
To give a more cohesive and complete look to the image, we are going to add some more watercolor effects behind the crows.In the “Watercolor” layer group, create a new layer behind the crows and pick one of the ink squirt brushes. Using the colors from of the highlights in the previous step, create some ink squirts behind the crows. Resize the ink squirts so they are proportional to the crow.
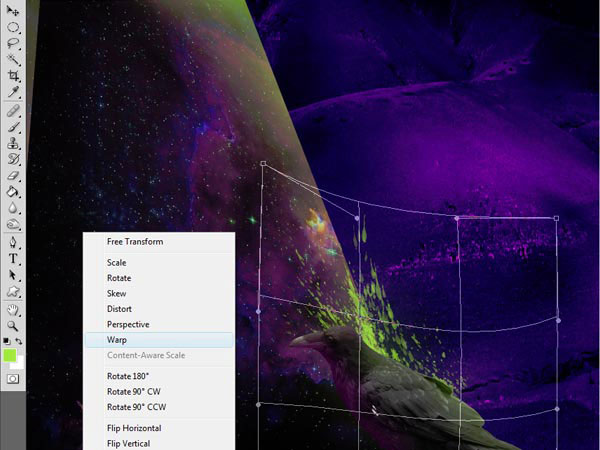
Use Warp Transform (Edit > Transform > Warp) to give some good flow to the squirts. Remember to apply outer glows on these ink squirts as well; you can just copy the layer style from Step 5.
Step 9: Creating Some Light Effects
Create a new layer group on top of the “Crows” group and name it “Light effects”.Download and open Fractal 1 and Fractal 2 (listed in the Tutorial Resources section above) in Photoshop. Drag them inside the new folder. Photo-manipulate their colors using the Hue/Saturation image adjustment (Hue: +62, Saturation: 0, Lightness: 0), changing their colors to the green we have been using.
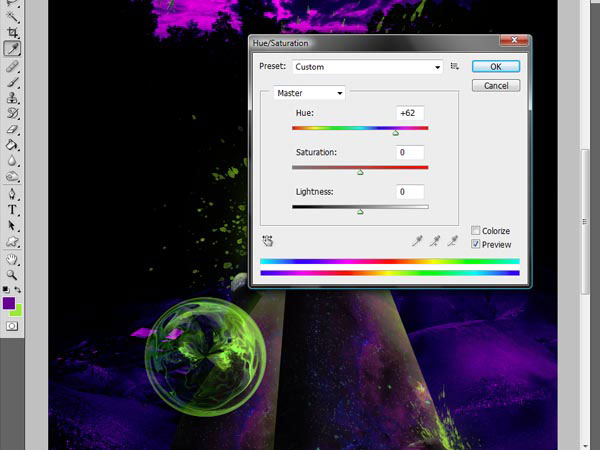
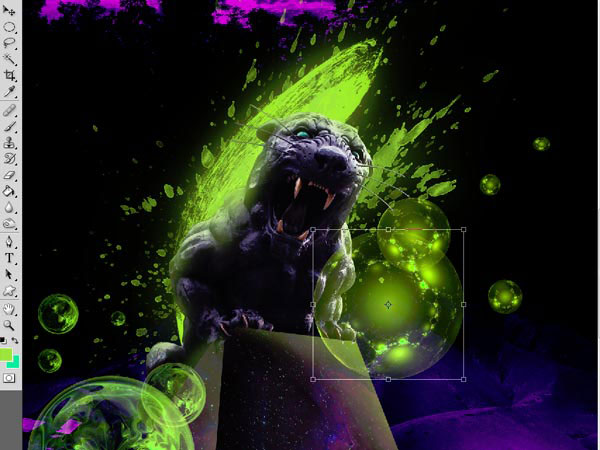
Now duplicate the fractal layers several times (Ctrl/Cmd + J). Use Free Transform (Ctrl/Cmd + T) to change their sizes; create variations between them so they don’t all look the same.
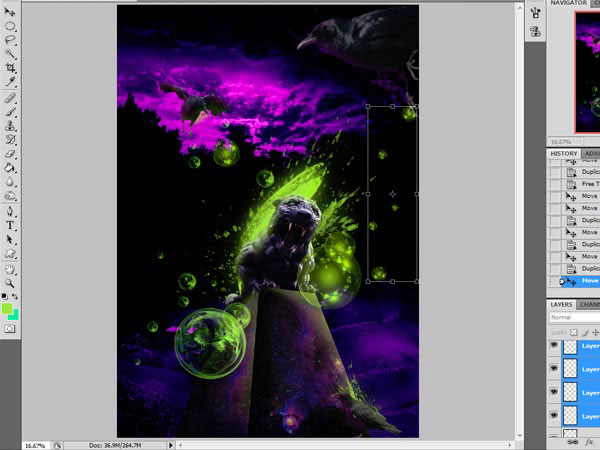
Place them randomly around the image as visual flourishes. Be careful not to overdo your composition by placing too many fractals into the scene.

Step 10: Create Glowing Eyes
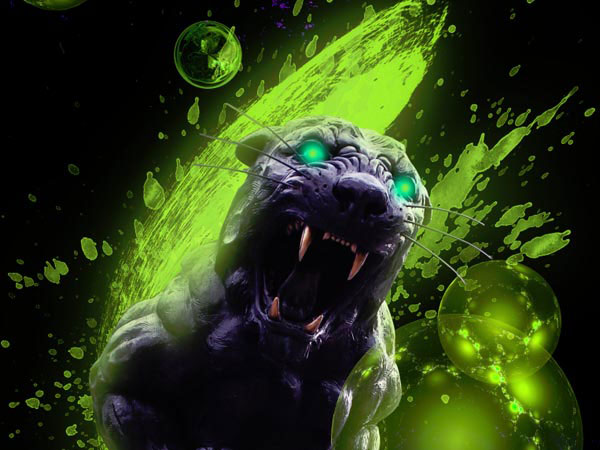
We can add to the surreal-ness of our composition by making the eyes of the panther and the crows glow with light. We will do this quickly and easily. Start by creating a new layer (name it “Eyes”).Let us start with the panther’s eyes. Grab a soft, round brush that is about 65px wide, set your Foreground Color to a light blue tone (#13ef9f) and then paint over the eyes of the panther. Change the size of the brush to 35px and using our lime green color (#a9e639), paint a stroke in the middle of the eyes (eyes are usually a different color in the middle because of the pupils).
Do the same thing with the crows.
Step 11: Creating Light Streaks
We are slowly finishing up by adding details in the composition. The last design elements we want to introduce are light streaks on the fractal bubbles. Grab a soft, round brush about 500px wide with the same light blue color we used for the eyes (#13ef9f) and then paint a circle on the canvas. Go to Edit > Transform > Warp and experiment with the light streak’s shape. Lower the layer’s Opacity to 80%. Duplicate the layer several times and move the duplicates by the other fractals. Create variations among the light streaks by using Transform commands.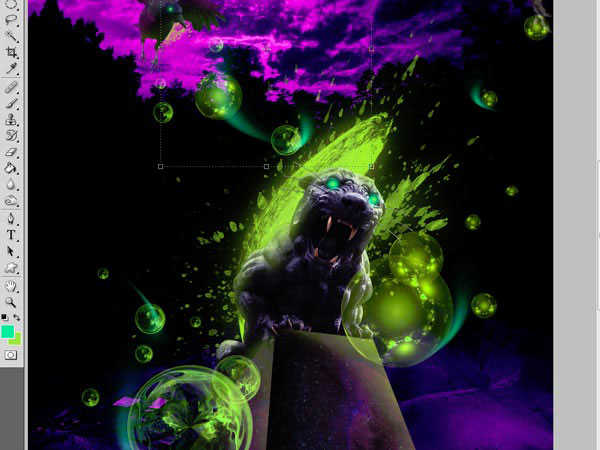
Step 12: Final Processing and Sharpening the Scene
For our last step, we are going to enhance the entire image. First, save your image as a JPG at maximum quality. Once saved, open it again in Photoshop.Duplicate the layer (Ctrl/Cmd + J). On the duplicate layer, choose Filter > Other > High Pass and apply the filter with a Radius of 2px.
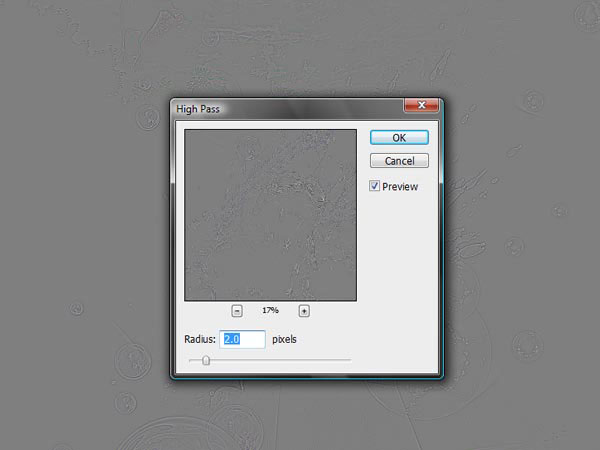
Set this layer’s Blend Mode to Overlay.
To achieve good resolution in the final image, go to Image > Image Size (Alt/Opt + Ctrl/Cmd + I) and change the size to something smaller than the original canvas (I used 600×860px). To finish up, save it again as a JPG at maximum quality.
Tutorial Summary
In this tutorial, I showed you several techniques for making a dark, surreal scene with a panther as our subject. We used unusual, high-contrast colors to give it this dreamlike, and somewhat menacing, color theme. We used clipping masks, Warp Transform, image adjustments, and much more. We emphasized accuracy and good visual hierarchy all throughout, drawing highlights on elements that are hit with surrounding light sources, transforming the elements such that they don’t take away from our subject and so on. I hope you learned some new tricks in this tutorial and please share your thoughts and questions in the comments.
 Previous Article
