Final Product What You’ll Be Creating
Source: http://cs5tutorial.net/960/
Final Product What You’ll Be Creating

Step 1
Create a 1000 by 1100px document. First, turn on the Grid (View > Show Grid) and the Snap to Grind (View > Snap to Grid). Now, you need a grid every 5px. Go to Edit > Preference > Guides & Grids then enter “5″ in the “Gridline Every” box and “1″ in the “Subdivision:” box.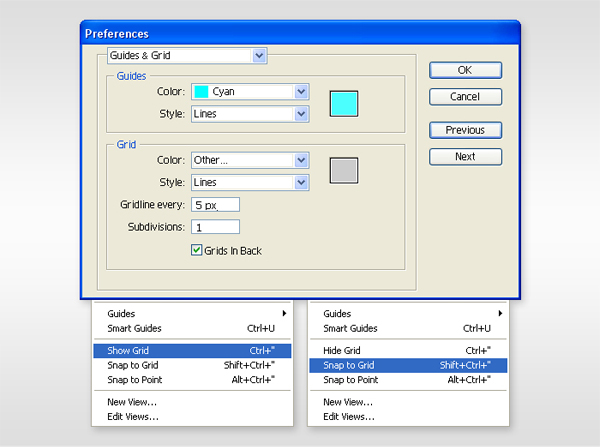
Step 2
Let’s create the basic shapes. Select the Rectangle Tool (M) and create a 100 by 100px shape. The Snap to Grid will ease your work. Create three new copies (Control + C then Control + F) of this square and move them as shown in the following image. Fill these shapes with R=204 G=204 B=204 and with R=230 G=230 B=230 then group them. Select this group and add the Transform effects shown at the end of the example.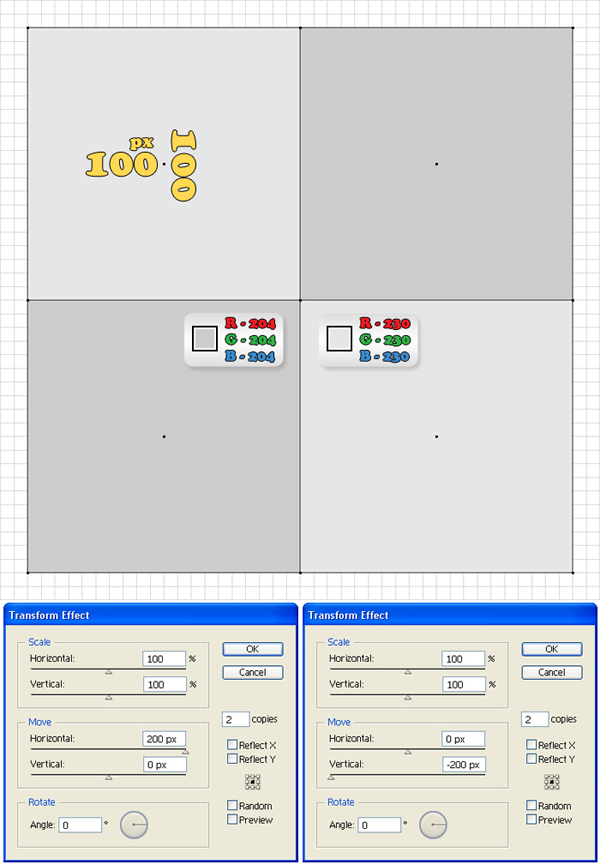
Step 3
Now your shapes should look like “image #1″. Select the four squares and go to Object > Expand Appearance. You should now have 36 squares. Ungroup the resulting shapes. This will make your work a bit easier in the following steps.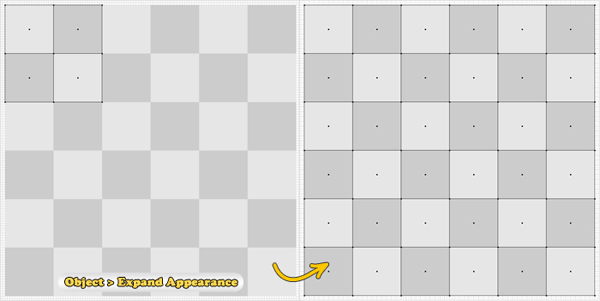
Step 4
Select the Ellipse Tool (L) hold Shift and create a 30 x 30px circle. Make a number of copies and place them like in the image below. Pay attention, the center of each circle must coincide with one side of the square (once again the Snap to Grid will ease your work). Now that you’ve made all these shapes, select them along with the squares and click on the Divide button from the Pathfinder panel.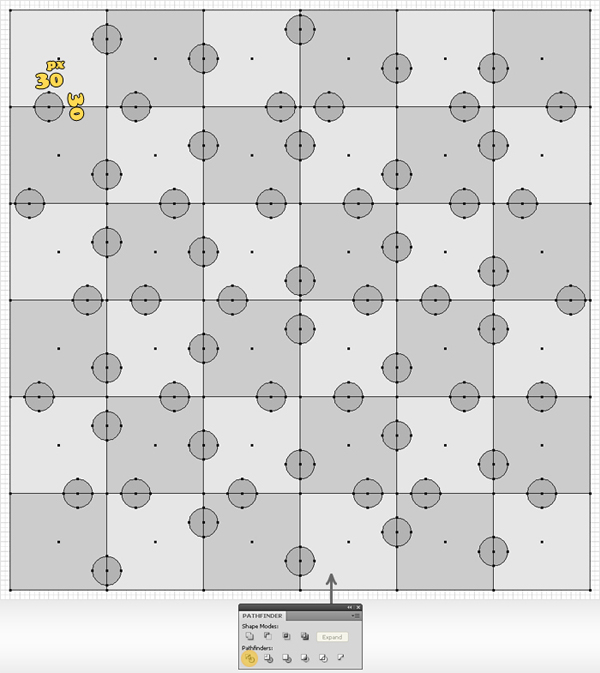
Step 5
Now, you’ll create the basic puzzle pieces. We’ll start with the top left one. Select the shapes shown in “image #1″ and click on the Unite button from the Pathfinder panel. Continue this way and create all the puzzle pieces. In image “3″ I’ve separated all the final pieces so that you can distinguish them easier. You don’t need to make them exactly that way.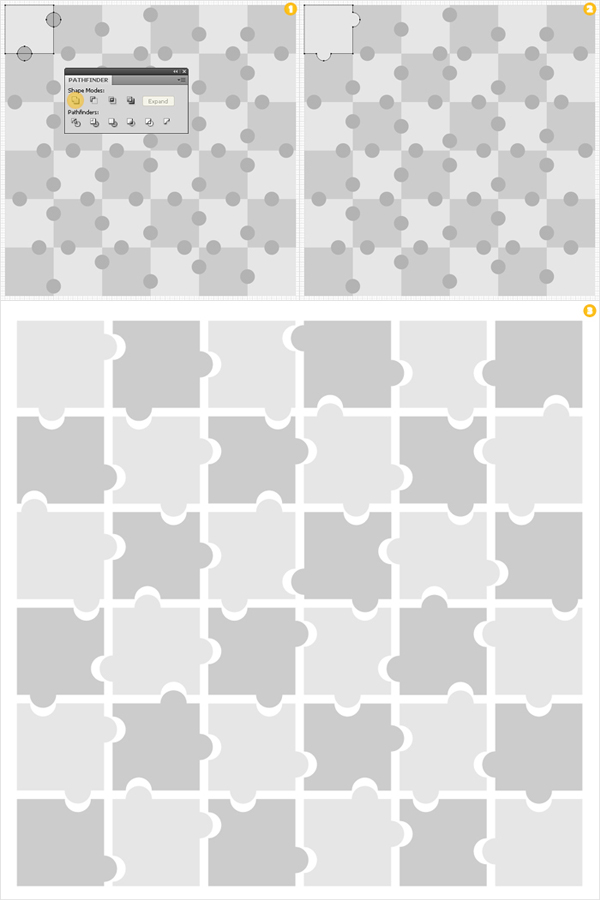
Step 6
Open the VectorTuts logo .Jpg file and resize it to 600x600px — The logo is included in the download file for Premium Members, if you don’t have a membership you can make your own 600 x 600px square image to use instead. Select your image, click on the Embed button, press Shift + Control + F11 (to open the Symbols panel) then go to the flyout menu and click on New Symbol. Name it “logo”, check Movie Clip then click OK. Reselect the Rectangle Tool (M), create a 600 x 600px square and place it just above the puzzle pieces. Fill it with any color.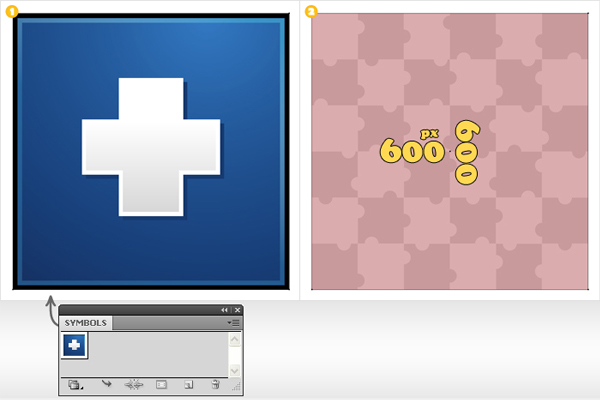
Step 7
Turn off the Grid and the Snap to Grid.You won’t need these options anymore. Select the rectangle made in previous step and go to Effect > 3D > Extrude & Bevel. Follow the data shown in the following image. Pay attention to the highlighted sections. You will need to add the image/logo. Click on the Map Art button, go to “Surface 1″ and select the “logo” from the Symbol drop down menu. Place it as shown in the following image then click OK. Reselect this shape and go to Object > Expand Appearance. Keep only the group with the image/logo and delete the rest of the the shapes. Rename this group “Logo” and make it invisible for the moment.

Step 8
Let’s focus on the puzzle pieces. Group them, add the same Extrude & Bevel effect then go to Object > Expand Appearance.
Step 9
Now, you should have a collection of shapes in your Layers panel. Select the shapes shown in the image below and press Control + G (to group them). Name all these shapes from “1″ to “36″ and make them invisible (for the moment).
Step 10
Select the shapes shown in “image #1″ and delete them. You should only have the group of shapes shown in “image #2″ left behind.
Step 11
Let’s continue with the details for each puzzle piece. Start with shape “1″.Create a new layer, name it “1″ and move shape “1″ inside this layer. Select the shape shown in image #2, ungroup it and move it inside layer “1″. Select the shape shown in image #3, ungroup it and move it inside layer “1″. Select the shapes shown in image #4, click on the Unite button from the Pathfinder panel and move the resulting shape inside layer “1″. Select the shape shown in image #5, ungroup it and move it inside layer “1″. Select the shapes shown in image #4, click on the Unite button from the Pathfinder panel and move the resulting shape inside layer “1″.

Step 12
Use the same techniques to create the other 35 puzzle pieces. Don’t forget to make a new layer for each puzzle piece (it’ll make your work easier). In the image below, I separated the puzzle shapes so that you can distinguish them from each other.
Step 13
Open the Transparency panel (Window > Transparency). Make the “logo” group visible then create 35 copies (one for each puzzle piece). Duplicate shape “1″ and fill it with white. Select this copy and the “logo” group then click on the Make Opacity Mask option from the fly-out menu of the Transparency panel. Select this masked shape, move it in the top of layer “1″ and lock it. Use the same technique for each puzzle piece until you get all the shapes covered with the VectorTuts logo (or image of your choice). Don’t forget to lock each masked shape. That way, you won’t select/move it accidentally.
Step 14
Move some of the puzzle pieces. Select the entire layer (from the Appearance panel) when you want to move a puzzle piece. That way you’ll move the locked shapes too (in this instance the masked logo).
Step 15
Next, you need to add some color for the visible puzzle margins. You will need one color and 5 gradients. Save them all in the Swatches panel to ease your work in the next steps. First of all, you need to fill the shapes with R=128 G=128 B=128 then you’ll have to deal with the linear gradients.
Step 16
Now, the gradients. Select the shape shown in image #1, add two new fills (from the fly-out menu of the Appearance panel) and use gradients 1 and 2. Next, select the shape shown in image #3, add two new fills and use gradients 2 and 4. Continue with the shape selected in image #5, add two new fills and use gradients 4 and 3. Select the shapes shown in image #7, add two new fills and use gradients 5 and 4. Finally, select the shape shown in the final image, add a new fill and use gradient 5.
Step 17
Use the same color and gradients for the other visible margins.
Step 18
Select all the shapes from “1″ to “36″ and duplicate them. Select these copies, click on the Unite button from the Pathfinder panel then go to Object > Compound Path > Make. Select the resulting shape and send it to the back. Move it a few pixels down and to the right, fill it with black, add a 3px Gaussian Blur effect then lower its opacity to 40%.
Step 19
Now, let’s focus on the other puzzle pieces. You need to create some thin, sharp shapes along the edge of these pieces. Start with piece “11″. Create two copies of this shape. Select the top copy and move it 1px up and 2px to the left (hit the up arrow once and the left arrow twice). Reselect both copies and click on the Minus Front button from the Pathfinder panel. Fill the resulting shapes with white. Now you’ll need to edit the resulting shapes. You might need to add some new shapes or delete some anchor points. Overall, you must try to make these shapes look sharp.
Step 20
Repeat the technique shown the previous step for shapes 17,18,20,22,23,24,25,27,28,32 and 34. Do not move the copies in the same direction. Use a random direction, experiment and see which fits best. Group all these white shapes then select the group, bring it to the front and lower its opacity to 10%.
Step 21
Once again duplicate all the shapes from “1″ to “36″. Select these copies and click on the Unite button from the Pathfinder panel then go to Object > Compound Path > Make. Pick the Pen Tool (P) and create a shape like the red one shown in image #2. Select it along with the other shape and click on the Intersect button from the Pathfinder panel. Select the resulting shapes and go to Object > Compound Path > Make. Fill this new shape with the linear gradient then lower its opacity to 10%. Do not forget to bring this shape to the front.
Step 22
Finally, for the background, select the Rectangle Tool (M) and create a 1000 x 1100px shape. Send this shape to the back and fill it with the first radial gradient. Add a new fill for this shape and use the second radial gradient. Select this final gradient (from the Appearance panel), change its blending mode to Overlay and you’re done.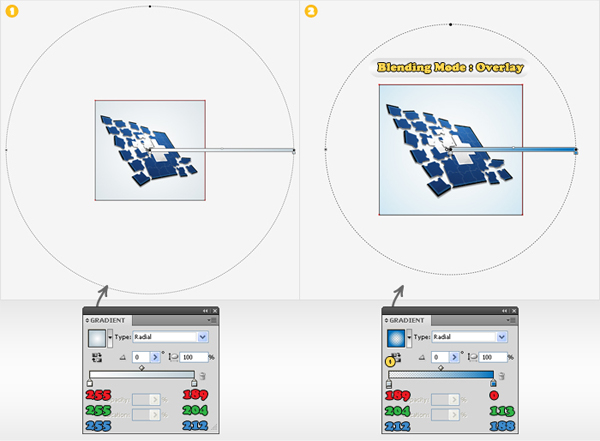
Conclusion
There you have it, a vector puzzle effect. You can try this effect with different image, or even different puzzle shapes. By using your imagination you will find that there’s many different ways you can use the techniques learnt in this tut. Have fun!
Tags: Photoshop Tutorial
 Previous Article
